Showing posts with label Martha Stewart. Show all posts

Wednesday, October 30, 2013

Trick or Treat

Halloween is upon us, and I have a few treats to share... mostly cards that I have made for family and friends.  I hope you will enjoy, since we ghouls just want to have fun!
A new stamp I picked up at Michael's this year.
Colored with Copics.  Love this cat!

The Count is from a Close to My Heart set and you can get it here.
The sentiment about Candy Corn is a very old one from my stash.
The Spider and Drippy Goo punches are Martha Stewart.


This one is for my Grandson P who has decided to be something
"scary" this year... a bat!  The stamps are 
Studio G Soloz collection (sorry about the glare).
The bat punch is from K @ Co. and the 
paper is from DCWV Ghosts & Goblins stack. 
I used Copics Opaque White and Smooch for the cloud and moon.


More Studio G stamps, Copics, and DCWV paper on this one, 
along with a bit of Glaze from Sakura.  


Our Jack-O-Lanterns are super easy this year!
This is a 3 liter soda from the Dollar Tree,
 (about 2/3 of the soda was gone and I just filled it with water!)
Add a vinyl, paper or drawn-on face,
a nice green bow,
color the lid with markers 
and you have a "no muss, no fuss" punkin!
This fun fellow was cut from the 
"Pumpkin Carving" Cricut cartridge.
Make a whole family with different size bottles :)

HAPPY HALLOWEEN!!


Photobucket

Monday, October 14, 2013

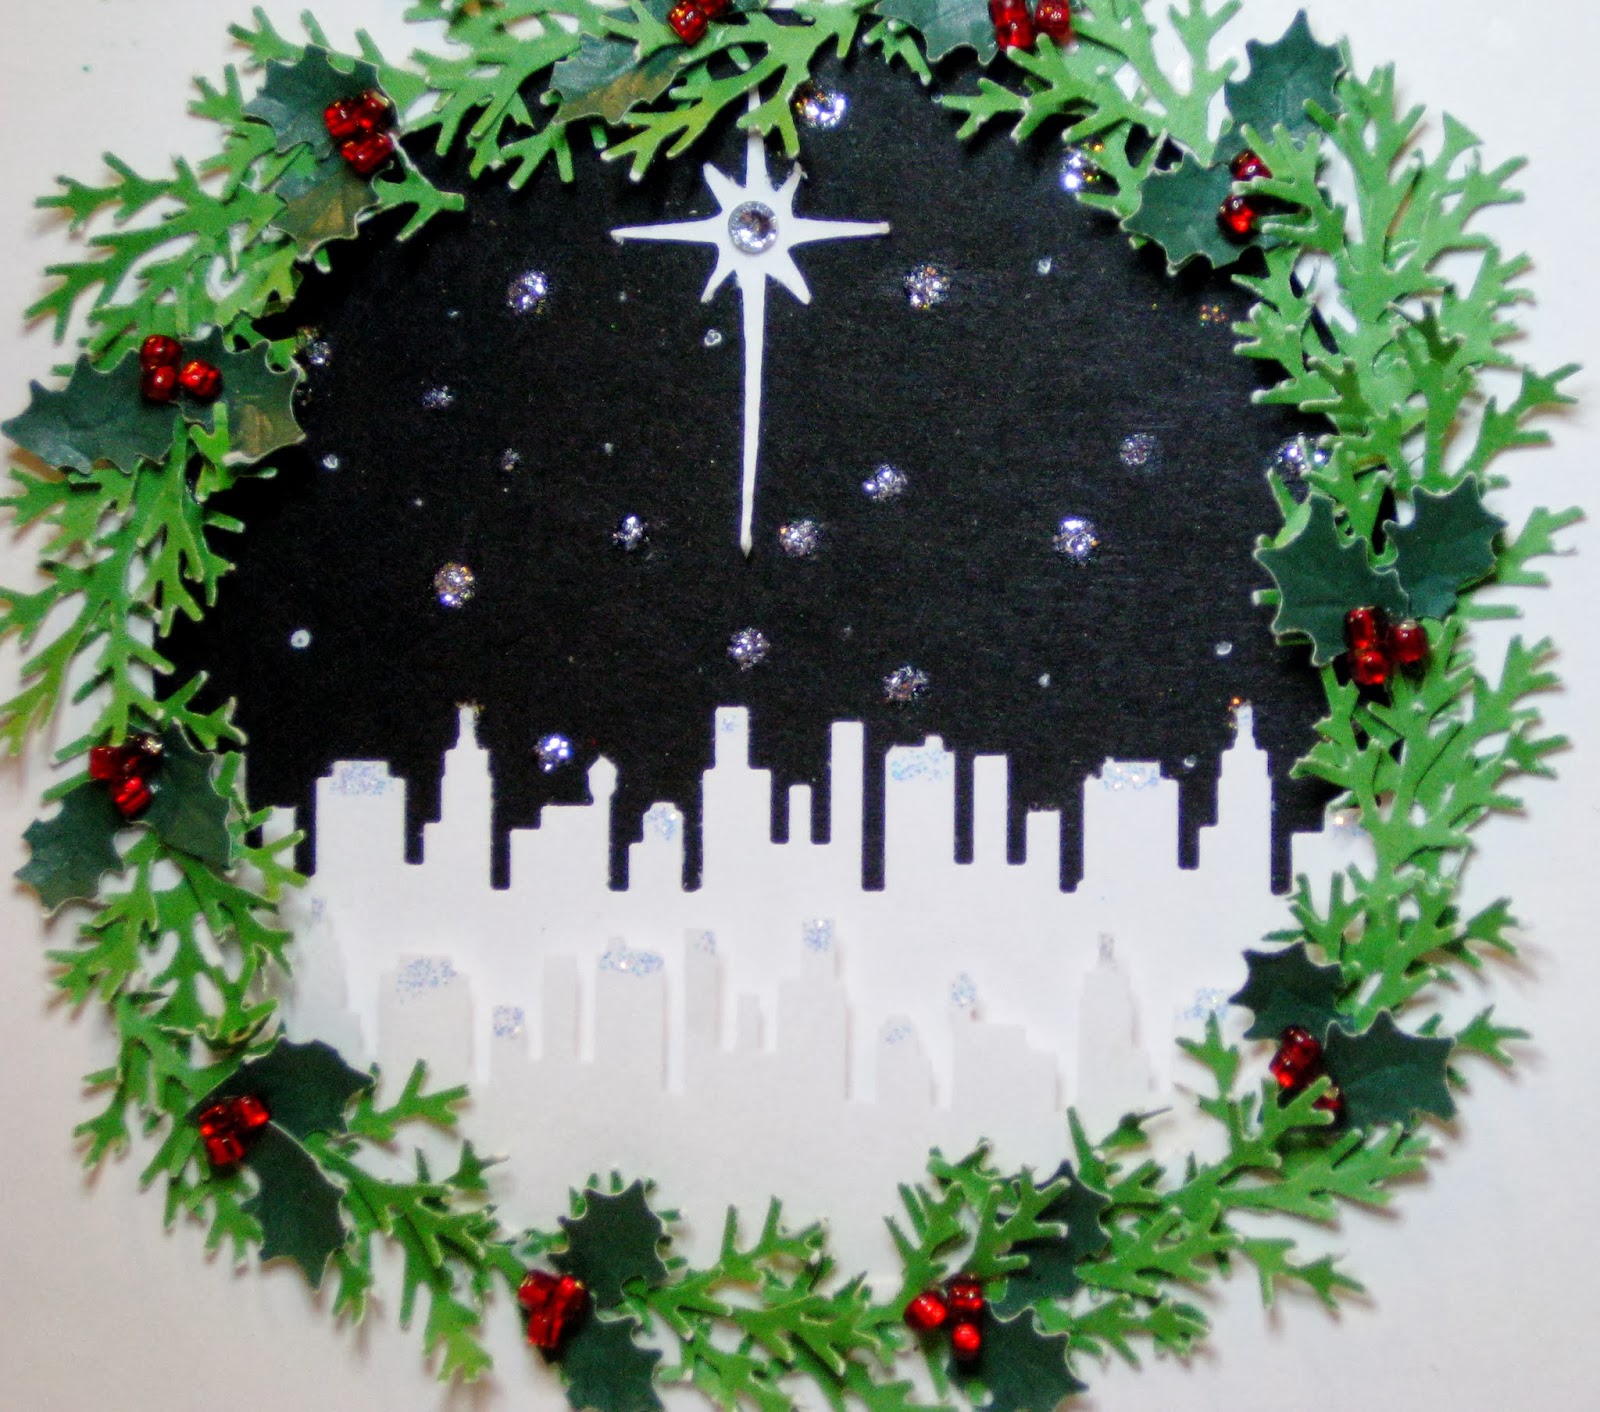
O Holy Night

It's hard to believe that I am posting Christmas cards as I am still making Halloween and Thanksgiving cards... but I'm excited about all of them!


This gorgeous card is 5 x 5.5 and makes a stunning presentation of the night sky.
There is a black layer 3.75  x 4.  
Using the Martha Stewart City Skyline punch, add two strips of skyline across the bottom third. 
The bottom layer is attached with dimensional dots.
The top white card is 4 x 4.25.  Cut a center hole with a 3" die cutter.
Use dimensional dots to center over the night scene.
Add a 1.25 inch Star of Bethlehem, with a small gem in the center.
Dot the night sky with white ink to indicate background stars, then
use Silver Stickles to dot on some stars, and Crystal Stickles to add luster to the roof tops.

Use the Martha Stewart Branch Punch to cut out approximately 25 branches. 
Layer them to create the wreath around the opening.
Top with small green holly leaves cut from a Martha Stewart Holly border punch. Use a stylus and foam pad to round the leaves for dimension.  Glue two to a cluster around the wreath.
Add three small seed beads to each pair of holly leaves to represent berries.

Stamp "O Holy Night" in the margin at the bottom of the card.  Use Silver Stickles to dot right in the center of each starburst on the lettering.  

Stamp desired sentiment inside.

Would you be interested in pre-made kits of this card?
Please leave me a comment!

Happy crafting ~


Photobucket

Sunday, July 14, 2013

Christmas in July

Friday Try-Day started off with three great cards they expected and then
 the ladies got a special surprise of a 
Christmas In July Card!!
This Splitcoast Stampers inspired card was so much fun to make, 
and they loved using the traditionally "halloween" Drippy Goo punch for the candles.

Here's how to make one for yourself!
Begin with an A2 background in red... 8.5 x 5.5 folded to 4.25 x 5.5
White 4 x 5.25 embossed with Snowflake design by Cuttlebug (Provo Craft)
Red cardstock cut to 2.75 x 3.75.  Add strip of punched Drippy Goo across top. 
Cut red/white piece into three - 1 x 2.75, 1.25 x 2.75 and the remainder is 1.5 x 2.75.
Use corner rounder (I used We R. Memory Keepers 1/4 Chompers) on candle edges.
Distress sides of candles with Vintage Photo Distress ink for depth.
Layer candles to desired positions and trim bottom edges evenly.  Glue together.
Place as single unit on card, 5.8" from the bottom of white card.
Punch out four holly leaves and six branch punch pieces.  Mold with ball stylus.  Adhere.
Use standard office hole punch for berries.  Mold to cup shape, invert and glue in place.
Add flames cut from flower petals.
Accent with red and silver Stickles.

Enjoy!  I'll be back with you again soon!
Happy crafting ~
Photobucket

Tuesday, April 23, 2013

Springtime in Paris

Ah, is there anything more romantic than thinking of Springtime in Paris?  I hope the flowers are blooming, and the fountains are flowing ..... well, at least they are here!
I started with an Inner Stair Step Card (4.25 x 5.5) ,
paper by Authentique, Seasons: Spring
and Hero Arts stamps

Two different Martha Stewart Punches added the layers in front.
The Deco Fan punch created the shimmery fountain
and the Tulip Garden punch added another layer of flowers 
The Boujour plates are cut from  Art Philosophy Close To My Heart Cricut Cartridge 

Add two flying butterflies on tiny strips of acetate
fly around the beautiful image of the Eiffel Tower
which has been accented with soft green and blue chalks.

Martha's branch punch is the perfect base for tiny star and circle punch flowers
along the front of the fountain and at the edges of the sentiment.
Add tiny spots of liquid pearls for flower centers.


Au revoir, mes amis!  Until we craft together again!


Photobucket

Tuesday, April 2, 2013

Happy Spring!

Are you ready to chase "Old Man Winter" out?  How about sending some cheerful, springy tulip cards with gingham or polka dot bunnies to usher in the warmth?  "Cards By The Yard" are ones that are such fun to make in multiples, and I bring you these today that will be perfect for welcoming Spring!
 I am using standard A2 size bases, Art Philosophy cartridge by Close to My Heart for the frame and tag, and Martha Stewart punches for the flowers and butterflies.  The bunny is my design from last year's Decor Bunny Project shrunk down to 1 1/2 inches.

Enjoy the video on making them!

Happy crafting, and I'll see you again soon!
Photobucket

Friday, May 11, 2012

Stamp Around the Page ~ Happy Mother's Day

I want to wish each of you a Happy Mother's Day, whether you are a Mom or not...
you have an influence in the lives of children.... they are watching!

This card was made with Martha Stewart's Stamp Around the Page set,
as well as elements cut with the Martha Stewart Elegant Cakes Cricut Cartridge,
and the Flower Shoppe Cartridge.

There were a number of reviews of the Stamp Around the Page set that revealed some design issues, so I addressed these "problems" and now get GOOF-PROOF images every time!
I have done a video to help you with perfect paper placement, too.
I hope you enjoy it!


Thanks for watching! 

I have classes coming up on Tuesday in Studio Bee if you want to know all about using your Circut, and on UStream Tuesday evening at 8:00!  Looking forward to seeing you soon.

Happy crafting ~

Photobucket

Wednesday, May 9, 2012

Corner Punch Flower Video and a Baby Card

Our friends, Krissy and Johnny welcomed a beautiful baby girl to the world yesterday! 
Isn't this vintage image just beautiful?  I've added some tiny baby pin charms, lace, and then a sweet double heart corner punch flower with Stickles to finish it off.

Last night's UStream class was all about "goof-proof" Corner Punch Flowers made from any size papers and any corner punches!  Today I was able to get the YouTube video posted, and here it is for you!


I hope you will be making lots of Corner Punch Flowers, and tell me about them here, and post them on our FaceBook/BettyBee Designs page!  That's your place to share your creations!!!

Happy crafting ~
Photobucket

Monday, May 7, 2012

Elegant Layered Flowers

OK, I have something else I want to share with Martha :o)  I am delighted to share a "Goof-Proof" way to make these gorgeous flowers with corner punches!  The fun part is it requires no measuring, no specific die cutting tools, and they come out "perfect" every time!  They are lovely in a vase, but great for cards, scrapbook pages, and especially 3D projects.  With Mother's Day next weekend, you will want to make whole bouquets of these beauties!   Come check out my UStream class on Tuesday evening at 8:00 eastern time!!  Bring a sheet of cardstock, your favorite corner punch, a pencil, scissors, and glue.... that's it! 


If you can't see the class live, it is recorded so you can watch at your leisure.  I will also try to get a YouTube recording done in the next few days.

I have been busy crafting, and you will be seeing the results soon!


Happy crafting ~

Photobucket

Tuesday, May 1, 2012

MS Stamp Around the Page

I have something to share with Martha!  I will be showing some "Perfect Every Time" tips for the Stamp Around the Page sets, as well as some other card goodies in my UStream TV class tomorrow night.  I hope you will be able to join in the fun!
Just click on the blue icon in the upper right corner of my blog to go directly to UStream/BettyBeeDesigns   The class starts at 8:00 eastern time.  As always, if you can't make it live, the classes are recorded, and you are invited to pop back and watch them at your leisure.

See you then!

Happy crafting ~


Photobucket

Tuesday, April 24, 2012

New and Revisited... Cards


This week's card class had three delightfully different techniques for the ladies to try out...
You saw the fun and cheerful layered sunflower card in my last post.

Here is the flashback project we revisited:

 This Criss-Cross Card was created in kraft colored paper, and layered with celebration papers, and borders were punched with Martha Stewart edge punches.  Add a belly band, and it is a fun way to send special greetings anytime of the year! 
 This shows the tag removed from the inside of the card, ready for your message.  This card can also be done in a horizontal mode, like this one from a couple of years ago:

Here's the link on this style Criss-Cross Card.  Hope you like it!

Our next beautiful creation was done with the new Martha Stewart STAMP AROUND THE PAGE stamping set.  I will be doing a video very soon showing some of the tips and techniques I have come up with to help make this is a very easy to use set, with great results.  The ladies made fabulous cards!

This was made on cream cardstock with copper cardstock on top, which had been punched with a Martha Stewart Punch Around the Page punch set to create the layered background.  The sentiment was a layered combination of Studio G and another small stamp that I had.  I will be sharing
these tips soon... (See the note at the bottom of the post.)

AND... Last, but certainly not least, here is a sample of the brightly colored creations made for
Little E's First Birthday Celebration!
 There were lots of banners, posters, cupcake toppers, a big 1 tied with ribbons, and other goodies... check out BettyBee Designs FaceBook page in a day or two to see the whole array!

And the Birthday Princess came by the hospital to visit with her Papa... who,
unfortunately, couldn't go to her party :(
She brought her smiles to him.

That brings me to my NOTE for this week's UStream Class... due to Bob the Babe being in the hospital, I will not be holding class. See you next week...
Wishing you all the best.

and Happy Crafting ~


 Photobucket

Wednesday, February 22, 2012

FACE Cards from Class

"FACE" Fun And Created (or Copied) Easily Cards!
These are the cards that we created in my UStream class last night  (If you missed it, the class was recorded and you can pop over to BettyBeeDesigns and check it out!) 
They are quick and easy to make, with lots of POP
and make great sets to give as gifts.

 This was my original inspiraton set, made with Anna Griffin papers, and the decorative items were made with stamps and punches.  The center trims were coordinated ribbons.
This set features a 2.25 x 5.5 piece of decorator paper on the bottom of the card face.  Then there are three  1.5 inch scalloped circles at the top.  The ones on the left were punched, and the ones on the right were cut with Basic Shapes 1 cartridge that comes with the Slice.  The buttons on the left were real, and the ones on the right are also made with the Basic Shapes 1 cartridge, and scored with a ball embossing tool on a soft mat.  The stamped image is from Stampin' Up!  The "Thanks" was done easily with the font letters from the Bon Appetite Slice cartridge,  Add a touch of twine and ribbon, and these are ready!
These notes are so cheerful!  They use the same dimensions as above.  The "vase" is a pitcher from the Faith Slice cartridge, with the handle removed, and trimmed across the top with scalloping scissors. The flowers on the left are purchased, and the ones on the right are from the Basic Shapes 2 Slice Cartridge.  Add a little  Stampin' Up! note, a little inking and a bit of trim, and these are ready to cheer up anyone's day :)
In the Garden of Life, "one of a kind friends" are the best,  and what's a better way to let them know than a very special card?!  Use the same dimensions as before, add a pretty trim across the middle, and a special greeting.  The one on the left is stamped, and the one on the right is also from the Bon Appetite cartridge.  The flowers are such fun! The pink one was punched with a 5 petal punch, then layered and the petals inked and curved.  The book print one was inked first, then four 5 petal flowers were cut with the Basic Shape 1 cartridge.  The first two layers were cut at 2" then one layer at 1.5"  and the last layer at 1".  Cut a flat circle to build upon.  Cut between two of the petals and overlap them to start the flower cupping upward.  Use a paintbrush handle to roll the petals into a natural look!  Glue the four layers inside each other, and then add a pretty pearl.  Done!
Last, but not least are the pretty butterflies.  The one on the left was stamped, then punched with a matching punch.  The one on the right was cut with Basic Shapes 2, first in red solid, and then in vellum, with the decorative design.  Score the body so it has a flat section in the center and adhere the pieces to the card with the wings fluttering.  Use a glittering Spica pen to add sparkle to the wings, and then draw out the flight path for your butterfly. 
I hope you enjoy making lots of fun and creatively easy cards!

Happy Crafting ~

Photobucket

Tuesday, August 23, 2011

Is It Trick or Treat Yet?


I have missed you all!  I have been traveling for a long time, and when I got home, we found something REALLY SCARY!  Our house was covered in  HAIRY MILDEW!!  It was on our clothes, furniture, cabinets, and all sorts of stuff.... the good news is it wasn't on my craft paper... WHEW!!  Anyway, that accounts for my absence since we have been home... getting things back in safe, clean order around here.  Well, all of that creepy stuff has definitely put me in the mood for Halloween, so for Digital Delights video this week, I have called on Dracula Ridley and friends to come and play!  I have a video for you today, on how I put in the bay window, (or a flat window if that is what you have).  It's easy and very versatile... enjoy! 

I'll see you again very soon!  I'm working on some projects for my U-Stream channel coming up next week!  Until then ...
Happy creating ~

Photobucket